|
Dogma is never a good idea in science. In fact, dogma and good science are philosophically incompatible. Sure, there are things that we can know and understand at a certain level, but isn't the point of science that we are always maintaining an openness and seeing how new discoveries unfold? Dogma creates a shutting off of the imagination, very dangerous in an enterprise where discovery and innovation are the keys to advancement. The field of nutritional science, of course, is not exempt. I deeply wish that I could figure out the "perfect diet", but I don't believe it exists. I do believe that there are ways to optimize diet for individuals, but it takes patience, experimentation, and an open mind.
Between the mass media and my nutrition degree, I have definitely absorbed my fair share of dogma over the past 20 years. My own quest for better health led me to (finally) see the dogma for what it was, and as I had success in weight loss, blood pressure control, reversal of hormonal issues, and blood sugar control, I allowed myself to open my mind to other sources of information. As I have been reading and learning in the past few years about different perspectives in the field of nutrition, I have sought to find the sources and the voices that are NOT: a) selling something b) using only anecdotal evidence and/or crappy data points c) clearly operating blinded by an agenda d) trying to support only the current nutritional dogma It's been an interesting experience, with lots of reading, and then reading the take-downs of the reading. I like to research the contrary view points to one author's findings. I like to read books like The Atkins Diet (supportive of high protein, low carb diets) and The China Study (supportive of vegan diets)side by side. It's fun and entertaining to read the impassioned conclusions of one author that completely contradict the conclusions of another. I like to read the books and papers with an open mind. I like to talk to people who follow the various diets and hear about their experiences, such as a friend who followed a vegan diet for 18 months only to gain weight and to have her cholesterol and triglycerides sky rocket. Intriguing. As I've been taking it all in, I have come to believe that there is probably no one right way for everyone the world over to eat. Bodies are different, circumstances are different, and the idea of establishing dietary dogma is simply laughable. However, I have found a lot of what I've read to be converging on some common points. I think the jury is still out on most of them, but much of the evidence behind the following is strong. Here's my list (so far), drawn from a number of books, articles, and research papers: 1. Fat is not bad. Eat fat - lots of it - but from good sources. (My current diet is about 50% fat, and my cholesterol has never been better.) Good sources include butter (ideally from grass-fed cows), olive oil, lard, nuts, and coconut oil. Avoid any form of vegetable oil (sunflower, canola, safflower, margarine, shortening). These fats are high in omega 6 fatty acids, and appear to cause inflammation and damage inside of blood vessels. 2. Grains are not for everyone. Grains can be avoided, and you can still have a very healthy, complete diet. Gluten seems to be particularly troublesome for a number of people, even those who have tested negative for Celiac disease. 3. Lower carb (100 grams or less a day) is probably a good idea for people with excess fat around their middles. 4. Highly processed foods (including soy products) should be avoided. Any foodstuff that has been exposed to high heat, pressure, or otherwise in making the food is going to be molecularly mangled. Never mind all the things that are done to make it shelf-stable. Watch out especially for high fructose corn syrup; corn, wheat, and soy derivatives; and cured meats (lunch meat, sausage, bacon, hot dogs) that contain nitrites and nitrates. 5. Veggies, veggies, veggies. Lots of them...at least 5 servings (1/2 cup cooked or 1 cup raw) a day. Organic whenever available. 6. Traditional preparation is superior. Fermenting (yogurt, kefir, real sauerkraut, real tofu) and slow stewing of meats and bone broths yields more nutrients that your body can absorb. If the standard advice works for you, you aren't on medications, you are at a healthy weight, and you feel great, then keep doing what you're doing. (Remember that joint aches and pains, chronic stomach pain, acid reflux, constipation/loose bowels, and fatigue are not normal.) If you've been doing all of the "right things" and continue to struggle with weight or not feeling well, chances are, it's time to think outside of the box. There is no grand unified theory of nutrition (yet) but much of the emerging data is supportive of the above principles. Doing some self-experimentation on a number of levels will help you to sort out what is effective for you. It doesn't cost anything to eliminate something from your diet. Give it time - at least 30 days - to see if it makes a difference. Be patient. If you want a guide along the way, feel free to contact me and we can talk. This is another recipe that fits the bill for comfort food, kid-friendly, and easily reheated fare. According to tradition, a shepherds pie is made with minced lamb or mutton, while a pie made with minced beef is called cottage pie. Around here, we call it shepherd's pie regardless of the type of meat it contains. I generally make it with beef, but grass-fed ground lamb works great, too.
Shepherd's pie is a bit labor intensive, but is easy to make ahead and refrigerate or freeze until you are ready to heat it for dinner. From the refrigerator, reheating will take about 30 minutes. It also reheats nicely for school or work lunches. I make a double batch of the recipe below and it lasts us for a few days' worth of lunches. The presence of potatoes and some vegetables helps to stretch the meat further, helpful on a budget, especially if you are trying to buy and use well-raised meat. There are 2 versions below - I make a double batch, cook all of the meat together, then make one large pan of "original" pie, and one small pan of primal pie. The original version contains corn and is topped with mashed potatoes. The primal version contains no corn, but other vegetables, and is topped with whipped cauliflower. Original Shepherd's Pie: 1 1/2 pounds ground beef, turkey, lamb, or any combination thereof 1/2 cup onion, chopped or minced 1/2 tsp salt black pepper 1/2 cup hot water or beef broth 6 medium sized potatoes 1/2 cup milk 4 Tbsp butter 1/2 tsp salt 1 package frozen corn 1. Wash and peel potatoes. Cut into chunks and put in large pot. Cover with water and bring to a boil. Boil for 10-15 minutes, or until potatoes are tender. 2. While the potatoes cook, start the meat. In a skillet, gently cook the ground meat until slightly brown. Add in onions, salt, and pepper and stir. Add in broth or water and stir. Allow to simmer 10 minutes, adding corn for the last 5 minutes of simmering time. Set aside. 3. Drain potatoes. Add butter, milk, and 1/2 tsp salt. Mash by hand or with mixer. Add milk as needed so that the potatoes are a spreadable consistency. Set aside. 4. Spread cooked meat and corn in the bottom of a casserole dish. Put mashed potatoes on top of meat and spread out gently with a spatula. Top with grated cheese if desired. Bake at 350 degrees for 30 minutes. Primal Shepherd's Pie Ingredients: Same as above, except: REPLACE corn with frozen or fresh vegetables of your choosing (I like grated carrots, broccoli, and green beans) REPLACE potatoes with 1 head of cauliflower 1. Cut a head of cauliflower into chunks. Rinse and place into a saucepan. Steam gently until tender. Drain and place back into pot. 2. Cook meat as above. Instead of corn, add in other vegetables for last 5 minutes of simmering. Set aside. 3. Add butter, milk, and 1/2 tsp salt to steamed cauliflower. Using a food processor, blend until pureed. Add milk as needed to make a spreadable consistency. 4. Spread cooked meat and vegetables in the bottom of a casserole dish. Put whipped cauliflower on top of meat and spread out gently with a spatula. Top with grated cheese if desired. Bake at 350 degrees for 30 minutes. I eat a lot of vegetables, and have found it is possible, every once in a while, to develop salad fatigue. I can only eat so many salads in a week and not get just a tad bit bored with them. Sure, I can mix it up with different toppings and dressings, but sometimes, a salad is just a salad, and I don't want to see another one for a few days. Also, depending on what's for dinner, I can get to the point where I don't want to be bothered with the making of the salad. Washing and drying leaves, tearing, chopping, making a fresh batch of dressing because we're almost out...
I have found that many vegetables get along very well with the oven. Throw a mixture of veggies cut into big chunks on a baking sheet, coat with some olive oil, and back at 400 degrees for 15-45 minutes (depending on the veggies you choose), and you end up with a delicious medley of tastes and textures. Roasting brings out the natural sweetness in many vegetables. And you don't lose a ton of nutrients to the water, like you can with boiling. Oven-roasted veggies can be served as a side dish or a main dish. Sometimes, having the vegetables, maybe drizzled with plain yogurt, is enough. Sometimes, they make a nice accompaniment to a main dish. I cut all of the vegetables into bite-sized chunks and put on a baking sheet. Then I (liberally) pour olive oil over them, and use a spatula to stir in order to thoroughly coat them. I sprinkle them with some salt and pepper, and throw them into a preheated 400 degree oven. Below are my favorites for oven roasting, listed in order from least amount of cooking time to longer amount of cooking time, with the lower end of cooking time being 20 minutes and the longer end being 45 minutes. You may need to do some well-timed veggie choreography as they cook - remove the onions and cabbage to a platter while the yams and potatoes finish cooking, for instance. These vegetables reheat well as needed, and can also be thrown together with some broth and pureed to make a creamy vegetable soup. For cabbage and cauliflower, try cutting it into slices, or "steaks". Onions Bell peppers Zucchini Green cabbage Red cabbage Cauliflower Eggplant Yams Butternut squash Turnips Beets Carrots Potatoes 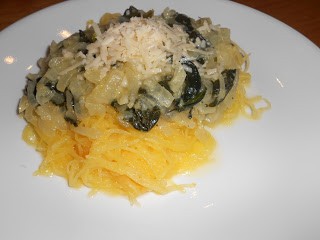 This recipe is adapted from "Moosewood Cookbook" by Mollie Katzen. This was a staple weekly meal before we had kids, when life was carefree and there was no one around to say "eeewww yuck" when I put something on the table. This sauce can be served over pasta (gluten-free or otherwise), spaghetti squash, grilled or pan-seared meats or fish, and also makes a great pizza sauce. Caramelizing the onions requires low heat and time - do not try to rush this process! (I speak from experience.) It's a great way to up the veggie factor in a meal, and makes a satisfying vegetarian entree. I have found mushrooms to be a nice addition, as well.
Tonight, the adults will have this sauce over spaghetti squash. I don't anticipate the boys will be excited about this one, so they can have their spaghetti squash with butter and cheese, maybe with some chicken to round it out. Ingredients: 1/2 cup olive oil 4-6 large onions, thinly sliced (this is the worst part) - about 6-8 cups 1/2 tsp salt 1/2 cup white wine (optional) 1 pound of spinach, fresh or frozen (thawed and drained if frozen), chopped 1 cup crumbled feta cheese Optional: sliced mushrooms, toasted walnuts, parmesan 1. Heat olive oil in a large skillet. Add onions and saute over medium heat for 15 minutes. Add salt, lower heat, and cook for at least another 10 minutes, or up to an hour for really sweet sauce. 2. Add white wine, and mushrooms if desired, and turn the heat back up to medium, and simmer uncovered about 15 minutes. 3. Add spinach and cook for an additional 5 minutes. 4. Add crumbled feta, turn to heat to low, and cover. Ready to serve. 5. Serve over pasta or squash, or use as a pizza sauce or omelette filling. Garnish with chopped walnuts and/or parmesan cheese. To carry on my love of butchering Mexican cuisine, tonight I will make tacos. This is my 9-year-old's most requested dinner, though not one of my personal favorites. Tacos are simple, right? It's a quick, easy-to-make dinner that can be thrown together in 30 minutes or less. I got off my dependence on seasoning packets, and even chili powder, while living overseas and have found that I still prefer to use the spice blends that I make myself. It's less expensive and I can be sure that there is no MSG, high fructose corn syrup, or strange wheat, corn, or soy derivatives lurking in our meal. My staple seasonings (sweet paprika, cumin, garlic powder, and salt) can all be bought in larger quantities. When I'm really organized, I make up a batch of my own taco seasoning (I also use a similar blend for chilis and fajitas) and store it in a glass jar.
Below are instructions for preparing refried beans and meat Emily style. Again, not at all authentic, I'm sure, but fast and easy. My recipe is definitely not spicy, to keep the young gentlemen happy, but you can add cayenne or other peppers to turn up the heat as desired. Of course, this meal is easily vegetarian-able by skipping the meat. Ingredients: Meat Mixture: 1 pound ground beef, turkey, or lamb 1 Tbsp sweet paprika 1 Tbsp cumin 2 tsp garlic powder or 2 cloves fresh garlic 1 tsp onion powder 1 tsp salt dash of black pepper 2 Tbsp tomato paste 1/4 cup water Beans: 2 cans (15 oz each) beans or equivalent amount of cooked beans (I use a blend of black and pinto or kidney, but have found that just about any bean works) 1 Tbsp sweet paprika 1 Tbsp cumin 1 tsp garlic 1/2 tsp salt dash of black pepper 2 Tbsp olive oil 2 Tbsp water Place the meat in a skillet and the beans in a saucepan and place on burners. Turn burners on to medium. Add seasonings to each dish at the same time to save time. Stir. Add olive oil and water to beans, and allow everything to heat, stirring often. Once the meat is partially cooked, add the tomato paste and water, stir, and continue to gently simmer. After about 10 minutes of cooking, mash beans with a hand masher, turn off heat under both, and cover. All done. Preparing the taco toppings can be more time intensive than the meat and beans. I like to have really crispy lettuce, shredded, diced tomatoes, black olives, jalapenos, shredded cheese, sour cream or yogurt, and salsa on hand. I will often put one of the boys to work shredding cheese while everything is cooking. Corn tortillas are a good gluten-free option. We have found brown rice tortillas to be tasty, but they crack when they are rolled up and that is completely unacceptable (for whatever reason) to the kids. So we stick to crunchy corn shells and floppy corn shells. I have yet to find organic floppy shells, but have found the Little Bear brand of crunchy shells to be a good option. (I look for non-GMO corn products whenever possible...many organic brands are also non-GMO.) I like to just make a big salad with all the toppings and skip the tortillas altogether. For a simple salsa option, try this recipe, taught to me by a previous neighbor and friend. Add the following ingredients to a food processor: 3 fresh tomatoes, chopped 1 onion, chopped 1 bunch of fresh cilantro, chopped 2 Tbsp lime juice 1 tsp sugar 1/2 tsp salt Blend until everything is finely chopped. It's delicious. Will keep up to 2 weeks in fridge. Mole (pronounced mol-ay) is a generic term for a sauce used in Mexican cuisine. There are many variations, but a common theme seems to be the use of chili peppers. Different mole variations involve different combinations of seasonings and ingredients - chocolate even shows up once in a while. Traditionally, the spices and peppers are roasted together and ground into a fine powder or paste, then added to water or broth and simmered until it is thick and rich. The resulting sauce is then served over meats, such as turkey, chicken, or pork. It can also be used in the preparation of dishes such as enchiladas.
The recipe below is a "quick and dirty" mole, not at all traditional. It contains cocoa powder and cinnamon, as well as other seasonings, to create a complex and rich flavor. It is quick to put together (15 minutes at the most) and well loved by everyone around here. I let it cook on low for a few hours in the crock pot, then shred the meat thoroughly, remove bones as necessary, add back into the crock pot, mix with the sauce, and let it cook a little longer. This could also be prepared in a Dutch oven. The key is in the long simmering time. Enjoy. Ingredients: 1 onion, chopped 2 cloves garlic, minced 3 Tbsp unsweetened cocoa powder 1 Tbsp chili powder OR sweet paprika 2 tsp ground cumin 1/2 tsp cinnamon 1 tsp salt ~ 28 ounces of tomato products - can be sauce/puree, crushed, diced, or a combination 1/2 cup water or chicken broth 1/2 cup or can of chopped green chilis (make sure they're not spicy if you have kids) ~1 1/2 pounds chicken parts, whatever parts you prefer, on or off the bone 1. Add the onion, garlic, cocoa powder, chili powder, cumin, cinnamon, and salt to the crock pot. Stir together. 2. Add tomatoes and water/broth to the crock pot. Combine well. 3. Add chicken pieces and green chilis. Stir together so chicken is well-coated in sauce. 4. Cover. Set on low. Cook for 6-8 hours, shredding and/or removing from bone near the end of cooking time. Add meat back in to sauce, set to warm, and leave until ready to eat. Serve with steamed rice, cultured sour cream or yogurt, and fresh cilantro to garnish, if you're lucky enough to have some. Great with a nice green salad on the side. For strict primal adherents, skip the rice and eat in a bowl like a stew. Or serve it over cauliflower or other cooked vegetables. Chicken fajitas are usually a huge hit with the family. At a restaurant, they will run about $15 a plate. For a fraction of the cost, you can buy your own chicken and vegetables (giving you the freedom to consider the source of your food, the types of oils it's cooked in, etc.) and make really good fajitas at home. On a work night, however, they can be a bit time consuming. Tonight this was invented out of necessity (leftover rice in the fridge, odds and ends in the veggie drawer, thawed chicken breast) and it was a huge hit with the family. It also makes great leftovers to send to school in lunches.
Ingredients: 1 onion, chopped 1 bell pepper, chopped 3 cloves garlic, minced 3 Tbsp oil 1 Tbsp chili powder 2 tsp cumin 1 tsp salt 1-2 pounds boneless chicken, cut into bite-sized chunks 2 cups cooked rice 1 cup tomato sauce 1 can of black beans, drained 1/2 cup shredded cheese 1. Add onion, garlic, pepper, and oil to a large skillet. Cook over medium heat until onion and peppers are soft. 2. Add chili powder, cumin, and salt, and combine well. 3. Add chicken. Stir. Allow to cook over medium heat for 10-15 minutes. If pan gets dry, add 1/2 cup water to deglaze. 4. Add rice, beans, and tomato sauce. Combine. Heat for a few minutes. Add to a baking pan/casserole dish. Top with cheese. Put in 350 degree oven for 30 minutes. Serve with sour cream and salsa. I love the idea of making my own cheese. I think it would be a super fun - and tasty - hobby. I have read about it extensively and considered investing in my own equipment and ingredients, but it hasn't happened yet. Based on my reading, mozzarella is a good place to start, and I hear it is fairly simple and dependable. However, after some frustrating experiences trying to make some Indian paneer a few years back, I've been gun shy on plunging into any further endeavors.
Labneh is a great "beginners" cheese - even simpler than mozzarella. And it starts with fermentation, in the form of yogurt. In Turkey, it's sold everywhere in tubs. It is sort of like cream cheese, but a little lighter...like Greek yogurt, but a little heavier. It makes a fantastic spread or dip. I have added garlic and herbs to it to use a veggie dip, and we've done plenty of just eating it plain, as well. Chips dipped in labneh was a fairly regular after school snack in our Turkish home. Making labneh is extremely simple. All it requires is plain yogurt, a cheese cloth, a strainer, and a bowl that the strainer can sit on top of. It also requires about 24 hours' worth of patience. I recommend full-fat yogurt all the time, but particularly for this recipe. This round was born of necessity. We have weekly milk deliveries. Some weeks it goes quickly; others, Thursday rolls around and we still have 2 bottles left, with another 3 due to be delivered. It was one of those weeks. Making yogurt and cheese is a great way to "preserve" milk, so I figured it was time. I used my own yogurt to make this (see directions at a previous post, http://sustenance-emily.blogspot.com/2011/12/fun-with-fermentation-easy-yogurt.html). Instructions: 1. Set up your straining apparatus: Get cheesecloth at a kitchen supply store or, sometimes, in the gadget section of a supermarket. (Hannaford sells it.) Cut out an 18 inch x 18 inch square of cheesecloth. Use it to line the bottom of a colander/strainer. Put strainer on top of a bowl or dish that it can sit partially on top of, so that it's not sitting on the bottom of the container, but also so that any liquid that strains off will be caught in the dish. (I set mine on a round Pyrex casserole dish.) 2. Let the straining begin. Dump 1 quart of plain yogurt into the cheesecloth. Gather up the corners and make a cute little bundle, while holding it over your straining apparatus. Twist to start squeezing out liquid. Tie off with string or clip with a clothespin. 3. Let the exercise in delayed gratification begin. Set the sweet little bundle of yogurt and cheese cloth into the strainer, over the catching container, and place in the fridge. Wait at least 24 hours. Give it a gentle twist and squeeze from time to time. The longer you strain, and the more you squeeze, the "drier" your cheese will be. Or stop part way and you'll see how Greek yogurt (which is just strained yogurt) is made. After about 24 hours, you should be able to "dump" the labneh from the cheesecloth into a suitable container. It's great as a spread or a dip, as is, or you can add yummies to it. Savory Veggie Dip/Cracker Spread: 1 batch of labneh 1 tsp minced garlic 1/2 tsp salt 1/2 tsp dried basil 1/2 tsp dried oregano 1/2 tsp dried mint Mix well. Serve. Sweet Fruit Dip/Spread 1 batch of labneh 2 tsp maple syrup 1/2 tsp cinnamon Mix well. Serve. Other ideas? It was over 4 years ago now that I really started to cut weight and get to the point I'm at now. There were a few key paradigm shifts that had to occur in order for that weight loss to happen, one regarding what I ate, and the other regarding how I moved. Having grown up in the eat-less-fat and do-cardio-until-you-hate-it years of the 80's and 90's, my mind set was, well, pretty well set. Eat less fat, more whole grains and carbs, and move more, and you'll lose weight and be fit. I started to read current research in exercise about the efficacy of eating more fat and protein and less carbs, and doing less cardio and more resistance training. Even after much reading, I was still "afraid" to try one of these changes - cutting out a step workout in favor of weight lifting? Crazy. Buy full-fat yogurt instead of nonfat? I'll gain weight! But finally, finally after doing all the right things for so many years (according to standard American dietary recommendations) and finding myself steadily gaining weight, I decided something different was worth a try.
Unfortunately, at the time, we were living in Istanbul, and I couldn't afford to pay for a gym, nor did I have the energy to navigate the gym experience in a foreign language on a regular basis. After extensive research online, I discovered the concept of bodyweight exercises - using your own body for resistance, instead of using weights. This fit well with my lifestyle, as I needed a workout that was portable, didn't require equipment, and could be done quickly and easily in a small space. I read a few different workout plans for this, and finally picked and chose the exercises that I felt offered the most bang for the buck. I created a program that I could do while watching the news or listening to music, in my bedroom or the living room, in a very small space (maximum I needed is 4' x 6'). This allowed me to stay relatively fit at no cost. I took many of the ideas for this workout from one I read online entitled the prison cell workout, as apparently many prisoners employ similar methods for staying fit. The nickname stuck, and now my whole family knows exactly what I mean when I say "I'm gonna go do my prison cell workout now." Wouldn't you know, as I substituted this simple, 20-30 minute workout for my hours of walking/running/step 2-3 times a week, I started to not only lose weight, but the shape of my body started to change. My waist got smaller and my stomach flatter. I felt stronger. My knees hurt less. I found my levels of fitness were improving. When walking/running, I had more endurance. And the numbers on the scale continued to drop. Since adding this in to my routine, I have lost a total of 30 pounds and maintained this loss fairly effortlessly. I still do this workout 2-3 times a week, though I did add dumbbells in about 2 years ago. Sometimes I do it at the gym (despite the funny looks), but usually I sneak it in at home, in the mornings, when I find myself with a 20-30 minute window of time. I love the simplicity - yet the effectiveness - of this workout. I love that it can be done in a hotel room when traveling, a bedroom, living room, basement...it's so adaptable. Below is an outline of my standard workout. Sometimes it looks different, but this is the "backbone" of what I do. Ideally, I would have video clips demonstrating the moves, but I have found a website that offers images of nearly all of my favorite exercises. There are links after each exercise. Basic Explanation: Do the following exercises in order, not resting in between exercises. After you’ve gone through the whole list, rest for 3 minutes, then start again. Work up to being able to repeat it 3 times in about 20 minutes. As you build up endurance, you can incorporate handweights into most of these. Start with 5 pounds. I have worked up to 12 pound dumbbells at this point. - Squats (40) – Keeping your weight on your heels, sit back as if you are going to sit in a chair. Go as low as you can, keeping your knees behindthe line of your toes, and not bending deeper than 90 degrees at the knees. Toes should be pointing straight forward, with feet hip width apart. Knees should be in line with 2nd and 3rd toes. (To add weights, hold one handweight behind your back, and place the other handweight on the floor in front of you. When you squat down, pick up the weight on the floor, and as you stand, raise it up above your head. Do 20 with one arm, then 20 with the other arm.) - Mountain climbers (40) - http://www.exrx.net/Aerobic/Exercises/MountainClimber.html - Lunges (15 each leg) -http://www.exrx.net/WeightExercises/Quadriceps/BWLunge.html (To add weights, hold handweight in both hands and do biceps curls as you step into a lunge.) - Squat thrusts or "Burpees" (15) -http://www.exrx.net/Aerobic/Exercises/Burpee.html (To add a challenge, jump up at the end of each one instead of just coming to a stand.) - Triceps dips (20) -http://www.exrx.net/WeightExercises/Triceps/BWBenchDipFloor.html (To make more challenging, step your feet further away from your body, or lift a leg off the floor.) - V ups (10 to start, work up to 20) -http://www.exrx.net/WeightExercises/RectusAbdominis/WtVUp.html (You could strap on ankle weights if you have them.) - Renegade rows, 8 on each arm. - http://www.youtube.com/watch?v=uSgzs5P2XIc&feature=related (Sorry for the poor youtube quality, but it is a good demonstration of the exercise.) You might want to start these with no weights at all, then slowly add weight. There are many other great body weight exercises that you can mix in. Push ups, pull ups, planks with all sorts of variations - there are lots of great ideas out there. This workout hasn't failed me in over 3 years. Have fun!! I love potato chips. Especially Utz Kettle Cooked potato chips. Especially a handful after a long day at work, when I'm actually hungry for dinner. And there is a place for them, in moderation. However, my idea of moderation tends to...ummm...mushroom over time, so that instead of a few a day, I'm having a few handfuls a day. Something my manatee-like metabolism just can't handle.
I also love Schezuan green beans. Like really love them. Can eat them like...Utz potato chips. So I got to thinking, why not just cook a batch of those after school, when it's too early to eat dinner, but when I want to have a bit of a snack that won't kill my appetite. A snack that is veggie-rich, but also satisfyingly savory and fatty. Like a potato chip, but better. And so this recipe was born. Ingredients Several tablespoons of olive oil 1 pound of fresh green beans, ends trimmed off 2 cloves minced garlic 1 Tbsp grated ginger 1 Tbsp tamari Water 1. Pour oil into a large skillet. Heat over medium temperature. 2. Wash and trim green beans. Pat dry. Add to hot oil. Stir fry for 5 minutes. 3. Add garlic and ginger. Stir fry for 10 minutes more. 4. Add tamari. Stir fry for 5 minutes. 5. Add a few tablespoons water to deglaze the skillet. Add more water, and allow to simmer gently for another 5 minutes. The green beans should be a little crinkly from the higher-heat frying, and have some nice crispy brown bits. Serve on a plate. Eat with your fingers, like fries. |
AuthorI'm Emily. I currently work in online education management, but I also have a Masters degree in Nutritional Sciences (my true passion). In addition, I am a mom, cook, avid reader, novice gardener, and enjoy all kinds of outdoor activities. On my blog, you will find articles on food, fitness, weight management, and eating issues. ALL recipes on my blog are gluten-free. Many are low-carbohydrate. Most are grain free. Enjoy! 
Categories
All
Archives
June 2019
|
