|
Yes, the name pretty much says it all. Except that it's delicious!! I'm more into mushrooms than ground beef these days, so I made these for myself as a burger alternative on a night when I made burgers for the men folk. I didn't get a picture because I ate it too fast! Next time.
I started the caps marinating, then the onions caramelizing, as soon as I got home from work. I sliced up some sweet potatoes and placed them on a lightly oiled cookie sheet, and preheated the oven to 400 degrees. The mushrooms only take 20 minutes or so grill to perfection, but the onions and sweet potatoes take about 40 minutes to get just right. Plan accordingly. Caramelized Onion Sauce Cook one large onion, chopped, in 2-4 Tbsp oil/butter (I used 1 part olive oil to 1 part butter) over medium-low heat for 30-40 minutes. Stir frequently. If the onion starts to brown really fast, turn the heat down, as they will burn given the right conditions. And that sucks, because then you have to start over, and it takes a while for caramelization to occur. (I speak from experience.) Marinade In a bowl, combine 1/4 cup oil (I used avocado oil this time), 1/4 cup rice vinegar, 2 Tbsp tamari sauce, 1/2 tsp salt, black pepper, and 1/2 tsp sage. Pour over mushroom caps and leave to marinade for at least 20 minutes. I also cut a red bell pepper into quarters and threw it in with the mushroom caps. Grill the mushrooms and peppers for 20-30 minutes, or until browned and soft. Serve mushroom cap topped with a red pepper slice and a generous pile of caramelized onions. I also topped mine with hamburger fixings - mustard, ketchup, and pickles. Enjoy with a side of oven-roasted sweet potato slices.
0 Comments
The chicken in this recipe is lightly breaded with a gluten-free blend of rice flour and seasonings that lend it a savory Mexican flavor. Minimizing the amount of flour coating keeps the carb count lower, but still offers a crunchy coating. The main thing with pan frying is to not shy away from using oil. A lot of it isn't actually absorbed into the breading if you cook it at the proper heat (hot enough that it's not a gentle saute, but not so hot that it reaches its smoking point.) I've been cooking with an olive oil/butter blend lately. The butter adds a nice richness to any recipe.
The recipes below are enough to serve 2-3 people. Chicken 2 boneless chicken breasts, pounded to 1/2 inch thickness 2 eggs 1/2 cup rice flour or GF flour blend 1/2 tsp salt 1 tsp cumin 1 tsp coriander 1 tsp paprika 1 tsp garlic powder oil/butter for frying - about 3/4 cup total 1. Pound chicken breast to a thickness of 1/2 inch. Cut into smaller pieces - 2-3 per breast. 2. Beat eggs in a bowl and set aside. Combine flour and seasonings in another bowl and set aside. 3. In a large skillet, heat oil and butter over medium heat. 4. Dip chicken breast into eggs, then in flour mixture. Place in skillet. Cook for 4-6 minutes, or until lightly browned on one side. Turn and cook for another 4-6 minutes on the other side, until lightly browned. 5. Cover skillet and turn heat down to low. Let it cook gently for another 8-10 minutes, being careful not to let it burn. If the skillet is too hot, take it off the heat but leave it covered. Mushroom Rice 1/2 cup chopped onion 2 cloves minced garlic 1 cup chopped mushroom 1 cup brown rice (use 2 cups grated cauliflower to make this grain-free and low carb) 3 cups water or broth 1/2 tsp salt 4 Tbsp oil/butter 1. In a saucepan, heat oil over medium heat. (I used half oil and half butter.) Add onions, garlic, salt, and mushrooms. Saute until onions are soft, 5-10 minutes. 2. Add brown rice. Stir to combine ingredients. (If you use cauliflower, just add it in and stir fry, skipping the next step. Once its cooked, it's ready to eat.) 3. Add 3 cups of water. Bring to a simmer, then turn burner to low. Allow to gently steam for 45 minutes. If water level looks low and rice is still crunchy, add more water 1/2 cup at a time and continue to steam. The rice will start to look creamy when it's close to done, as it releases its starch. I did a lot of stirring, almost as if this were a risotto. Avocado Salsa Dice an avocado. Stir in 1/4 cup of salsa verde. Serve over chicken. 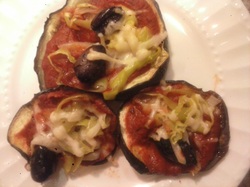 Pizza is probably one of the foods I miss most since being gluten-free. I have tried all kinds of pizza crust recipes and substitutes. Many of them are, frankly, just not worth the effort. (My fave so far is here.)Some come close to the chewy-stretchy perfection that defines most gluten-full crusts, but they still aren't the same. And most GF pizza crusts are still high in carbs, something that my body doesn't tolerate very well.
I have found humble eggplant slices to be one of the most nutritious and convenient crust replacements. I have also found that with the right toppings, I enjoy this form of "pizza" nearly as much as actual pizza. Tonight I topped my pizzas with sauce, bell peppers, onions, banana peppers, and olives. I find that, even though I mostly avoid cheese and milk, a little bit of parmesan is fine. I pre-bake the eggplant alongside the GF crust that I prepare for the boys, and we can all enjoy pizza together. Ingredients 1 large eggplant, cut into 1/2 inch slices Tomato sauce or crushed tomatoes Herbs and salt, if you just use crushed tomatoes Parmesan cheese, grated Pizza toppings: peppers, onions, mushrooms, olives, etc. 1. Place eggplant slices on a cookie sheet and sprinkle with salt. Allow to stand for 10 minutes. This will remove most of the bitter flavor from the eggplant. Rinse slices and pat dry when done. 2. Lightly oil the cookie sheet. Place slices on and pre-bake at 400 degrees for 10 minutes. After 10 minutes, flip them over and bake for another 10 minutes. 3. Remove from oven. Spoon on sauce, and add toppings. I put a very light sprinkling of parmesan on top and find this is enough cheesiness for me. I also find that very finely chopped toppings taste better. 4. Bake for another 10 minutes at 400 degrees. All done. :) This entire meal will take about 20 minutes of prep time, then 1 hour of oven time, during which you can do other things, like read. Or workout. Or throw a load of laundry in.
This is a basic meatloaf recipe. Nothing fancy, because that's the way the boys like it. The sauce I put on the top is my mom's "secret" recipe. Ingredients: 1.5 lb ground beef 1 cup milk 1 tsp salt 1/4 tsp black pepper 1 small onion, diced or grated (I learned to grate onions in Turkey. It's great for kids who don't like onion bits in their food.) 1/2 cup bread crumbs (use gluten-free, or use GF oats) 1 egg Topping: Mix together 1/2 cup ketchup, 2 Tbsp mustard, and 2 Tbsp brown sugar. Barbecue sauce works, too. Mix everything together. I often use my hands and knead it like bread dough. Bake at 375 for 30 minutes, then put the topping mixture on and bake for another 30 minutes. While the meatloaf is baking, put a few scrubbed potatoes in the oven for baked potatoes. Maple-y Acorn Squash Boats: Cut an acorn squash in half, scoop out the seeds, and place flesh-side down in about 1/2 inch of water in a baking dish. Let it bake for the first 30 minutes with the meatloaf. After 30 minutes, turn the squash over, empty the water from the pan, and add a pat of butter, a sprinkle of salt, and a drizzle of maple syrup. Bake for 30 minutes more. This is one of my "convenience" meals. It's quick (under 45 minutes) and, in my opinion, just as yummy as restaurant curry. This requires using a Thai Kitchen product called Green Curry Paste. You can find it in the Asian section of most grocery stores, along with the coconut milk you'll need for this recipe. One jar will make 3-4 batches of this meal. It will cost around $4.
I once researched how to make my own green curry paste. As you can see, I buy it. Much less complicated. There are directions on the jar for making this curry, but I do things a little differently. Ingredients: 1 large onion, chopped 2 cloves garlic, minced 1 Tbsp freshly grated ginger (optional) Olive oil or coconut oil 1.5 lb chicken, boneless breast or thigh, cut into bite-sized chunks 3 cups of chopped vegetables - I have used carrots, cauliflower, fresh green beans, broccoli, red peppers, all in different combinations 1 can coconut milk 2-3 Tbsp green curry paste 1 Tbsp brown sugar Salt, to taste (I usually add about 3/4 tsp) 1. In a large skillet, heat oil over medium heat. Add onion, garlic, and ginger. Saute for 5 minutes. 2. Turn heat up to medium high. Add chopped chicken. Stir fry for about 5 minutes. 3. Turn heat down. Add vegetables, coconut milk, curry paste, and brown sugar. Cover and let simmer for 20-30 minutes. While it simmers, start cooking rice of your choosing (I'm partial to Basmati), or prepare a package of rice noodles. Serve curry over rice or noodles. I had the pleasure of trying this dish a few weeks ago at a small Lebanese restaurant in Nashua. It was amazing. I think this is a delicious and satisfying midweek option for a family. Caramelized onions make a great base for soups, pasta (like this one) and pizza sauces, and work great in this dish, as well, adding that interesting combination of sweet and savory. Serve this dish with plain yogurt and a nice salad for dinner. Also reheats nicely for lunches the next day.
Ingredients: 3 Tbsp olive oil 1 medium onion, chopped 1 clove of minced garlic 1 tsp ground cumin 1 tsp salt and fresh black pepper to taste 2 cups of lentils, rinsed 6 cups of water, or broth of your choosing 1 cup of rice (I use brown) 1. Heat oil in a large, deep saucepan over medium heat. Add onion and saute gently for 10 minutes, until softened. Stir frequently. When onions start to brown, add about 4 Tbsp of water and allow them to cook until the water cooks off. This will complete the caramelization. 2. Add cumin, garlic, and salt and pepper. Cook for 2-3 more minutes, just enough to let the flavors combine. 3. Add the lentils and 4 cups of liquid. Allow to cook for about 20 minutes, until lentils are softened. Stir occasionally. 4. Add enough liquid so that the lentils are covered by about 1 inch of water. Stir in the rice. Cover and turn the heat to low. 5. Check the lentils and rice after about 20 minutes. They should both be tender, and all of the water should be absorbed. If needed, add more liquid, cover, and cook for a few more minutes. 6. Serve garnished with fresh parsley, if desired, and with plain, full-fat yogurt on the side. This is one of my favorite quick school night dinners. It is simple, yummy, and can be ready in about 30 minutes from the time I walk in the door. This recipe uses red curry paste - I buy the Thai Kitchen brand - and fish sauce. These will keep great in the refrigerator and you will get about 5 meals from one jar of paste. I follow the recipe on the curry paste jar, but have doctored it up a bit as well. A word on fish sauce: it stinks. Like really stinks. But it's supposed to, so don't throw it away, thinking you got a bad batch. It gives Thai food its distinctive flavor, and once it's simmered with all of the other ingredients, you don't notice it. I promise. Just don't put too much in. This recipe is easily vegetarian- or vegan-ized. Just use tempeh or tofu in place of the chicken. Or just stick with veggies - I have thrown in peppers, cauliflower, green beans, potatoes, peas, broccoli...most veggies pair very well with the flavors in the sauce. If you object to the idea of fish sauce, use a tamari sauce or soy sauce instead, or just throw in some extra salt. It won't be the same, but it should still be tasty. I have often thought that a white flaky fish or shrimp would work really well in this recipe, but I haven't tried that yet.  Ingredients:
1 pound of chicken, or about 2 cups chopped meat substitute of your choice 1 onion, chopped Olive oil 2 Tbsp grated fresh ginger 2 cloves garlic, minced 2 cups of chopped vegetables of your choice 1 can coconut milk 1 Tbsp red curry paste 1 Tbsp fish sauce (or 1/2 tsp salt) 1 Tbsp brown sugar 1. Start jasmine rice cooking on a separate burner. 2. In a large skillet, heat oil over medium heat. Add onion, ginger, garlic, veggies, and chicken. Saute gently for 10 minutes. 3. Pour in can of coconut milk. Add curry paste, fish sauce, and brown sugar. Stir to combine. 4. Allow mixture to simmer gently for another 15-20 minutes, stirring occasionally. Serve over rice. 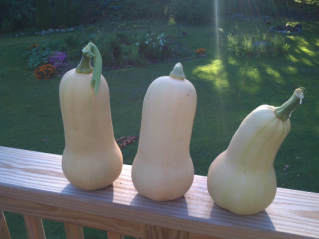 I didn't intend to grow butternut squash this year. I find that the vines take up way too much of my limited garden space, and for the past two years, my squash plants have gotten a strange fungus which spreads to other plants. This year, however, I must have had one rogue seed that managed to germinate and a vine cropped up. I couldn't bear to cut it back - it was so green and healthy - and so I have this huge butternut plant growing all over my garden. Surprisingly, this one vine has remained very healthy and has produced more squashes so far than my multiple plants produced last year. I have had one casualty to the lawn mower (it was being pushed by a 12-year-old), but I have 3 that have ripened, and at least another 5 on the vine that should mature in the next few weeks. I found this recipe on the back of a can of coconut milk, and have adapted it slightly.
Ingredients: 1 large onion, chopped 2 cloves garlic, minced 2 Tbsp grated fresh ginger 2 Tbsp olive oil 2 tsp ground coriander 1 tsp ground cumin 4 cups of chopped butternut squash (fresh or frozen) 1 can coconut milk 4 cups of broth (vegetable or chicken) or water, with 1 tsp salt added Salt and pepper to taste 1. In a large pot, combine the olive oil, onion, garlic, and ginger. Cook over medium heat until onions are translucent, about 10 minutes. 2. Add coriander and cumin. Cook for another 5 minutes, until aromatic. 3. Add broth and chopped squash. Simmer gently for 30 minutes, or until squash is tender. 4. Using a blender (traditional or immersion will work) blend squash/broth mixture until smooth. Return to medium heat. 5. Add coconut milk. Simmer for another 5 minutes, or until warm. Garnish with fresh cilantro if desired. 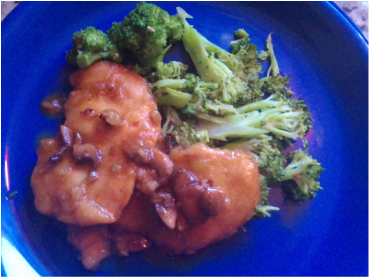 This was an experiment - it's a dish I love but had never made before. I also wasn't sure the kids would love the mushroom and wine qualities of the sauce. I decided to give it a try, and it was a huge hit all around. The recipe below is a combination of several different recipes that I read and then tweaked to my liking. It can be served with pasta, but skip the pasta and serve on a bed of roasted veggies or spaghetti squash for a delicious veggie-rich, low-carb dinner. I used broccoli sauteed with garlic. The quantities below just served four.
I mention a flour blend in the recipe. To make this gluten free I do not, of course, use wheat flour. For all of the cooking and baking I do, I use the same ratio of flours: 1 part tapioca starch: 1 part potato starch: 2 parts brown rice flour I store the mixture of the two starches in one canister to simplify. Ingredients 1.5 lb chicken breast, pounded to 1/2 inch thickness (or purchase the thin cutlets or tenders) 1 cup flour blend 1 tsp salt 1/2 cup olive oil 2 Tbsp butter 2 cloves minced garlic 1 cup white mushrooms, sliced 3/4 cup Marsala wine 1/2 cup water 1. In a shallow dish, mix flour blend with salt. Pound chicken breasts if needed. Set aside. 2. Heat olive oil in a large skillet over medium heat. Using lots of oil is imperative to the chicken pieces browning up properly - don't skimp. 3. Once oil is heated, coat the chicken pieces in the flour blend and put in the skillet. Cook about 5 minutes on each side, until golden brown. If you are doing larger quantities, you will need to set the cooked chicken aside on a plate and cook it in batches. 4. Once all chicken is cooked, remove any breading that has accumulated from the skillet, or use a new skillet. Melt the butter, then add the garlic and mushrooms. Saute for 5 minutes. 5. Add Marsala wine and water. Bring to a simmer for 10 minutes. 6. Put the chicken pieces back into the pan with the sauce. After 5 minutes, flip the pieces over to get them thoroughly glazed. Simmer for another 5 minutes. If the sauce appears to be thickening too much, add water 1/4 cup at a time. Serve over pasta or vegetables. This is a nice alternative to tacos for either a make-ahead dinner or for company. It also reheats really well for lunches or leftover dinners. Leave out the meat, or replace it with sauteed veggies or mashed yams, to make a vegetarian entree.
Ingredients 1 large pack soft corn tortillas 1 pound ground beef Chili powder Cumin Salt Pepper Garlic 1 large can tomato sauce OR 2 cans tomato paste OR 1 large can enchilada sauce 1 can black beans 1 cup corn 1 carton sour cream 2 cups shredded cheese 1 can chopped green chiles Small bunch of scallions 1. Make sauce: mix tomato sauce with 1 Tbsp chili powder, 1 tsp cumin, minced garlic (to taste) and 1 tsp salt. If using paste reconstitute with 2 cups water. Or just open can of enchilada sauce. 2. Cook beef with chili powder, cumin, garlic, and some salt and pepper. Set aside. 3. Make cheese mixture by mixing sour cream, cheddar cheese, and chopped green chiles. In a rectangular baking dish, place 1 layer of tortillas. Cover with a third of the sauce. Add half of the meat, beans, corn, and chopped scallions and spread evenly. Place half of cheese mixture by putting evenly spaced spoonfuls on top of everything else. Place another layer of tortillas and gently press down to distribute the dollops of cheese mixture. Cover tortilla with another third of the sauce, remaining meat, beans, corns, scallions, and cheese. Add 1 more layer of tortillas. Cover in sauce. Bake covered at 350 for about 30 minutes or until bubbly. You can add more shredded cheese on top at the end and bake it for another 5 minutes to melt. |
AuthorI'm Emily. I currently work in online education management, but I also have a Masters degree in Nutritional Sciences (my true passion). In addition, I am a mom, cook, avid reader, novice gardener, and enjoy all kinds of outdoor activities. On my blog, you will find articles on food, fitness, weight management, and eating issues. ALL recipes on my blog are gluten-free. Many are low-carbohydrate. Most are grain free. Enjoy! 
Categories
All
Archives
June 2019
|
