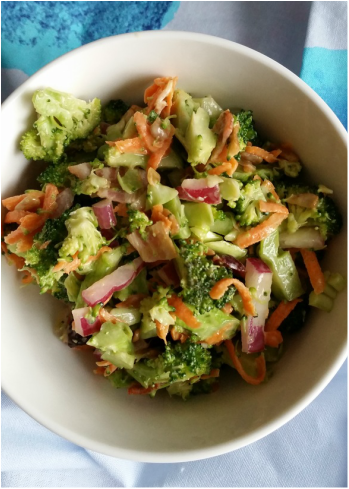
 This is a paleo-friendly makeover of a summer potluck classic. I first had this over a decade ago when my good friend made this for a cookout, but in its classic form. Old school style involves broccoli, bacon, shredded cheddar, raisins, sunflower seeds, and a slightly sweet and tangy coleslaw-type dressing. I overhauled the recipe just a bit for a gathering we hosted on the fourth of July, taking the cheese out to keep it dairy-free, cutting down on the sugar in the dressing, and adding grated carrots for extra crunch and color. I made a huge bowl and it was gone by the end of the night. It was such a hit with my own family that I actually made another big batch this morning. This is the type of salad that can keep for a few days, and actually tastes better after the flavors have had an opportunity to meld as it chills.
One important piece: chop things very, very small. It tastes better. I don't know why - something about surface area and being able to get more little bits of different things into one bite. Ideally the dressing would be made with paleo-friendly mayo - either homemade or purchased. I used conventional because I have never mastered the art of mayo making. I would love to get good at it, but I have wasted many high quality products trying a few times and, sadly, have given up that fight. But I would imagine any number of alternatives would work fine in the recipe, even skipping mayo altogether, though it lends a creaminess I really like. Ingredients 4 cups of well-chopped broccoli 1/2 cup chopped red onion 1 cup grated carrots 1/3 cup dried cranberries 1/2 cup sunflower seeds For the dressing, combine the following in a separate bowl: 1/2 cup mayonnaise 1/4 cup olive oil 1/4 cup white vinegar 2 Tbsp sugar 1/2 tsp salt Mix veggies and dressing in a large bowl. Toss well to combine. Refrigerate for at least 4 hours before serving. Will remain delicious for about 1 week in the fridge.
0 Comments
 Today was supposed to be spent doing a 12-mile loop hike in the mountains, tagging two more 4,000 footers. But it rained. And yes, we could have gone in the rain. But it's so much more fun on a nice day. So it turned into a (much needed) day at home. Having just finished my first week at a new job, I needed some down time.
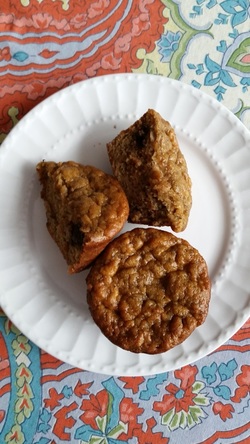
In the midst of working through a large sorting/cleaning/moving project, I decided to make some banana muffins. What I really wanted was banana bread, but even the GF flours bother me sometimes, so I decided to go with a grain free recipe. This is one that I've made once before, but I tweaked it a bit and it came out much better. The coolest thing about this recipe is that it has NO FLOUR. None. Not coconut. Not almond meal. Not rice flour. So I don't have to worry about the nut issue (son is allergic to tree nuts) or the "funny taste" of coconut that both kids complain about. This is a 6-ingredient recipe, and you won't believe it unless you try it. I throw my browning bananas into the freezer and save them for smoothies or baking. Today I happened to have 3. They thaw very quickly if you put them in a bowl of water...it took about 15 minutes this morning. I used peanut butter (not paleo, strictly) because we have a kid with tree nut allergies, but I'd love to try this with cashew or almond butter. And I used maple syrup that my older son made this spring when he and a friend tapped some trees on the property and boiled it down. Ingredients 1 cup nut butter 1 1/2 cups mashed bananas 1 tsp baking soda 1 tsp vanilla 3 eggs, beaten 1/3 cup maple syrup or honey 1 cup chocolate chips (optional) 1. Combine all ingredients in a mixing bowl. Stir until well combined. 2. Grease 12 muffin tins, and fill 3/4 full with batter. 3. Bake at 350 degrees for 20 minutes. The muffins will need to sit and cool for about 15 minutes until you attempt to eat them. They are initially quite soft, but will become a consistency such that you can pick it up and eat it just like a regular muffin. If you can't wait that long, I recommend a plate and a fork (from personal experience...). The chicken in this recipe is lightly breaded with a gluten-free blend of rice flour and seasonings that lend it a savory Mexican flavor. Minimizing the amount of flour coating keeps the carb count lower, but still offers a crunchy coating. The main thing with pan frying is to not shy away from using oil. A lot of it isn't actually absorbed into the breading if you cook it at the proper heat (hot enough that it's not a gentle saute, but not so hot that it reaches its smoking point.) I've been cooking with an olive oil/butter blend lately. The butter adds a nice richness to any recipe.
The recipes below are enough to serve 2-3 people. Chicken 2 boneless chicken breasts, pounded to 1/2 inch thickness 2 eggs 1/2 cup rice flour or GF flour blend 1/2 tsp salt 1 tsp cumin 1 tsp coriander 1 tsp paprika 1 tsp garlic powder oil/butter for frying - about 3/4 cup total 1. Pound chicken breast to a thickness of 1/2 inch. Cut into smaller pieces - 2-3 per breast. 2. Beat eggs in a bowl and set aside. Combine flour and seasonings in another bowl and set aside. 3. In a large skillet, heat oil and butter over medium heat. 4. Dip chicken breast into eggs, then in flour mixture. Place in skillet. Cook for 4-6 minutes, or until lightly browned on one side. Turn and cook for another 4-6 minutes on the other side, until lightly browned. 5. Cover skillet and turn heat down to low. Let it cook gently for another 8-10 minutes, being careful not to let it burn. If the skillet is too hot, take it off the heat but leave it covered. Mushroom Rice 1/2 cup chopped onion 2 cloves minced garlic 1 cup chopped mushroom 1 cup brown rice (use 2 cups grated cauliflower to make this grain-free and low carb) 3 cups water or broth 1/2 tsp salt 4 Tbsp oil/butter 1. In a saucepan, heat oil over medium heat. (I used half oil and half butter.) Add onions, garlic, salt, and mushrooms. Saute until onions are soft, 5-10 minutes. 2. Add brown rice. Stir to combine ingredients. (If you use cauliflower, just add it in and stir fry, skipping the next step. Once its cooked, it's ready to eat.) 3. Add 3 cups of water. Bring to a simmer, then turn burner to low. Allow to gently steam for 45 minutes. If water level looks low and rice is still crunchy, add more water 1/2 cup at a time and continue to steam. The rice will start to look creamy when it's close to done, as it releases its starch. I did a lot of stirring, almost as if this were a risotto. Avocado Salsa Dice an avocado. Stir in 1/4 cup of salsa verde. Serve over chicken. 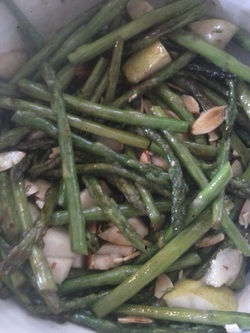 Ingredients
1 bunch of fresh asparagus, trimmed and cut into 4" stalks Olive oil 1 fresh pear, diced 1/4 cup slivered almonds Salt and pepper Balsamic vinegar 1. Cook asparagus in a well-oiled skillet over medium-high heat for about 5 minutes, stirring occasionally. Remove from heat and allow to cool. 2. When cool, add pear, almonds, salt and pepper to taste, 3 Tbsp balsamic vinegar, and 1 Tbsp olive oil. Toss and serve, cold or at room temperature. This is one of my "convenience" meals. It's quick (under 45 minutes) and, in my opinion, just as yummy as restaurant curry. This requires using a Thai Kitchen product called Green Curry Paste. You can find it in the Asian section of most grocery stores, along with the coconut milk you'll need for this recipe. One jar will make 3-4 batches of this meal. It will cost around $4.
I once researched how to make my own green curry paste. As you can see, I buy it. Much less complicated. There are directions on the jar for making this curry, but I do things a little differently. Ingredients: 1 large onion, chopped 2 cloves garlic, minced 1 Tbsp freshly grated ginger (optional) Olive oil or coconut oil 1.5 lb chicken, boneless breast or thigh, cut into bite-sized chunks 3 cups of chopped vegetables - I have used carrots, cauliflower, fresh green beans, broccoli, red peppers, all in different combinations 1 can coconut milk 2-3 Tbsp green curry paste 1 Tbsp brown sugar Salt, to taste (I usually add about 3/4 tsp) 1. In a large skillet, heat oil over medium heat. Add onion, garlic, and ginger. Saute for 5 minutes. 2. Turn heat up to medium high. Add chopped chicken. Stir fry for about 5 minutes. 3. Turn heat down. Add vegetables, coconut milk, curry paste, and brown sugar. Cover and let simmer for 20-30 minutes. While it simmers, start cooking rice of your choosing (I'm partial to Basmati), or prepare a package of rice noodles. Serve curry over rice or noodles. 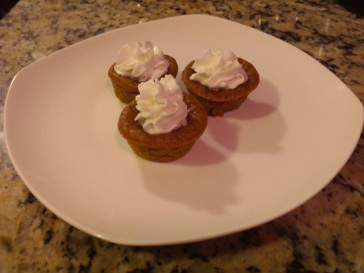 Fall time = pumpkin time, right? Pumpkin is not only delicious, but also full of nutrients including vitamin A, B vitamins, and minerals such as copper and potassium. I love pumpkin baked goods, but rarely bake them myself anymore. I saw a recipe shared on Facebook this week that looked so delicious, I thought I might try it. It was a "conventional" recipe, but I have adapted it to be dairy- and gluten-free.
These muffins come out like the inside of a pumpkin pie, so if you don't like super moist cakes/muffins, this probably isn't the recipe for you. They are firm enough to hold onto and eat like muffins, but just a tad gooey. I LOVED them, as did everyone in the family, but I can imagine that there are some people who would not enjoy their texture. Saturday turned out to be a lovely fall day, cool and crisp, with some rain in the mix later in the day. It was a perfect day for baking, especially something involving pumpkin and cinnamon. I found that I had already packed my muffin tins away, but still had a mini-muffin tin to use, so that's what I did. Turns out they packed really well and tasted great at the summit of a mountain today, and were much easier to share due to their small size. This recipe would be easily "paleo-ized" by using almond meal or coconut flour in place of the GF flour I chose. Ingredients Pumpkin puree, make your own or buy a 15-oz can (I bought the can.) 3/4 cup of your favorite sweetener (I used 1/2 cup white sugar and 1/4 cup brown sugar) 2 large eggs 1 tsp maple syrup (original recipe calls for vanilla but I was out...) 3/4 cup coconut milk (from a can, stirred well before measuring) 2/3 cup flour (I used a GF blend that has xantham gum included, but remember to add 1/2 tsp xantham gum in addition to your favorite GF flour if not in the mix) 1 tsp cinnamon 1/2 tsp nutmeg (if desired) 1/4 tsp ginger (if desired) 1/4 tsp salt 1/4 tsp baking powder 1/4 tsp baking soda Preheat oven to 350 degrees F. Butter 24 mini muffin tins (or 12 regular sized muffin tins). Pour batter into tins until about 2/3 full. Bake for 25-30 minutes, checking occasionally for doneness. These will be very, very moist, but if you check them and they still seem too underdone, put them in for 5 minute intervals. Let stand and cool for at least 20 minutes, then remove from pan and serve. You can top them with whipped cream, or whipped coconut cream if you are dairy-free. How to make coconut cream, you ask? Buy a can of coconut milk (NOT "lite"). Scrape the solid layer off the top and add to a mixing bowl. Add about 1 Tbsp sugar. Whip with an electric mixer on high speed for several minutes, until peaks form in the cream. Serve as a topping for your pumpkin pie bites. 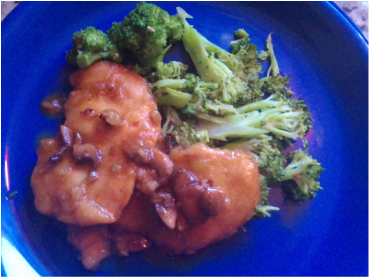 This was an experiment - it's a dish I love but had never made before. I also wasn't sure the kids would love the mushroom and wine qualities of the sauce. I decided to give it a try, and it was a huge hit all around. The recipe below is a combination of several different recipes that I read and then tweaked to my liking. It can be served with pasta, but skip the pasta and serve on a bed of roasted veggies or spaghetti squash for a delicious veggie-rich, low-carb dinner. I used broccoli sauteed with garlic. The quantities below just served four.
I mention a flour blend in the recipe. To make this gluten free I do not, of course, use wheat flour. For all of the cooking and baking I do, I use the same ratio of flours: 1 part tapioca starch: 1 part potato starch: 2 parts brown rice flour I store the mixture of the two starches in one canister to simplify. Ingredients 1.5 lb chicken breast, pounded to 1/2 inch thickness (or purchase the thin cutlets or tenders) 1 cup flour blend 1 tsp salt 1/2 cup olive oil 2 Tbsp butter 2 cloves minced garlic 1 cup white mushrooms, sliced 3/4 cup Marsala wine 1/2 cup water 1. In a shallow dish, mix flour blend with salt. Pound chicken breasts if needed. Set aside. 2. Heat olive oil in a large skillet over medium heat. Using lots of oil is imperative to the chicken pieces browning up properly - don't skimp. 3. Once oil is heated, coat the chicken pieces in the flour blend and put in the skillet. Cook about 5 minutes on each side, until golden brown. If you are doing larger quantities, you will need to set the cooked chicken aside on a plate and cook it in batches. 4. Once all chicken is cooked, remove any breading that has accumulated from the skillet, or use a new skillet. Melt the butter, then add the garlic and mushrooms. Saute for 5 minutes. 5. Add Marsala wine and water. Bring to a simmer for 10 minutes. 6. Put the chicken pieces back into the pan with the sauce. After 5 minutes, flip the pieces over to get them thoroughly glazed. Simmer for another 5 minutes. If the sauce appears to be thickening too much, add water 1/4 cup at a time. Serve over pasta or vegetables. This is another recipe that fits the bill for comfort food, kid-friendly, and easily reheated fare. According to tradition, a shepherds pie is made with minced lamb or mutton, while a pie made with minced beef is called cottage pie. Around here, we call it shepherd's pie regardless of the type of meat it contains. I generally make it with beef, but grass-fed ground lamb works great, too.
Shepherd's pie is a bit labor intensive, but is easy to make ahead and refrigerate or freeze until you are ready to heat it for dinner. From the refrigerator, reheating will take about 30 minutes. It also reheats nicely for school or work lunches. I make a double batch of the recipe below and it lasts us for a few days' worth of lunches. The presence of potatoes and some vegetables helps to stretch the meat further, helpful on a budget, especially if you are trying to buy and use well-raised meat. There are 2 versions below - I make a double batch, cook all of the meat together, then make one large pan of "original" pie, and one small pan of primal pie. The original version contains corn and is topped with mashed potatoes. The primal version contains no corn, but other vegetables, and is topped with whipped cauliflower. Original Shepherd's Pie: 1 1/2 pounds ground beef, turkey, lamb, or any combination thereof 1/2 cup onion, chopped or minced 1/2 tsp salt black pepper 1/2 cup hot water or beef broth 6 medium sized potatoes 1/2 cup milk 4 Tbsp butter 1/2 tsp salt 1 package frozen corn 1. Wash and peel potatoes. Cut into chunks and put in large pot. Cover with water and bring to a boil. Boil for 10-15 minutes, or until potatoes are tender. 2. While the potatoes cook, start the meat. In a skillet, gently cook the ground meat until slightly brown. Add in onions, salt, and pepper and stir. Add in broth or water and stir. Allow to simmer 10 minutes, adding corn for the last 5 minutes of simmering time. Set aside. 3. Drain potatoes. Add butter, milk, and 1/2 tsp salt. Mash by hand or with mixer. Add milk as needed so that the potatoes are a spreadable consistency. Set aside. 4. Spread cooked meat and corn in the bottom of a casserole dish. Put mashed potatoes on top of meat and spread out gently with a spatula. Top with grated cheese if desired. Bake at 350 degrees for 30 minutes. Primal Shepherd's Pie Ingredients: Same as above, except: REPLACE corn with frozen or fresh vegetables of your choosing (I like grated carrots, broccoli, and green beans) REPLACE potatoes with 1 head of cauliflower 1. Cut a head of cauliflower into chunks. Rinse and place into a saucepan. Steam gently until tender. Drain and place back into pot. 2. Cook meat as above. Instead of corn, add in other vegetables for last 5 minutes of simmering. Set aside. 3. Add butter, milk, and 1/2 tsp salt to steamed cauliflower. Using a food processor, blend until pureed. Add milk as needed to make a spreadable consistency. 4. Spread cooked meat and vegetables in the bottom of a casserole dish. Put whipped cauliflower on top of meat and spread out gently with a spatula. Top with grated cheese if desired. Bake at 350 degrees for 30 minutes. |
AuthorI'm Emily. I currently work in online education management, but I also have a Masters degree in Nutritional Sciences (my true passion). In addition, I am a mom, cook, avid reader, novice gardener, and enjoy all kinds of outdoor activities. On my blog, you will find articles on food, fitness, weight management, and eating issues. ALL recipes on my blog are gluten-free. Many are low-carbohydrate. Most are grain free. Enjoy! 
Categories
All
Archives
June 2019
|
