 Pizza is probably one of the foods I miss most since being gluten-free. I have tried all kinds of pizza crust recipes and substitutes. Many of them are, frankly, just not worth the effort. (My fave so far is here.)Some come close to the chewy-stretchy perfection that defines most gluten-full crusts, but they still aren't the same. And most GF pizza crusts are still high in carbs, something that my body doesn't tolerate very well.
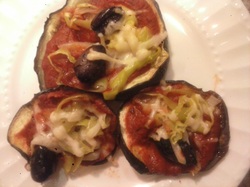
I have found humble eggplant slices to be one of the most nutritious and convenient crust replacements. I have also found that with the right toppings, I enjoy this form of "pizza" nearly as much as actual pizza. Tonight I topped my pizzas with sauce, bell peppers, onions, banana peppers, and olives. I find that, even though I mostly avoid cheese and milk, a little bit of parmesan is fine. I pre-bake the eggplant alongside the GF crust that I prepare for the boys, and we can all enjoy pizza together. Ingredients 1 large eggplant, cut into 1/2 inch slices Tomato sauce or crushed tomatoes Herbs and salt, if you just use crushed tomatoes Parmesan cheese, grated Pizza toppings: peppers, onions, mushrooms, olives, etc. 1. Place eggplant slices on a cookie sheet and sprinkle with salt. Allow to stand for 10 minutes. This will remove most of the bitter flavor from the eggplant. Rinse slices and pat dry when done. 2. Lightly oil the cookie sheet. Place slices on and pre-bake at 400 degrees for 10 minutes. After 10 minutes, flip them over and bake for another 10 minutes. 3. Remove from oven. Spoon on sauce, and add toppings. I put a very light sprinkling of parmesan on top and find this is enough cheesiness for me. I also find that very finely chopped toppings taste better. 4. Bake for another 10 minutes at 400 degrees. All done. :)
0 Comments
 I love burgers, but I don't love ground beef. Back in my vegetarian days, I frequently ate various brands of veggie burgers, or made my own lentil or bean burgers. I have missed the Garden Burgers the most - I actually prefer a good veggie burger to a beef burger. But check out this list of ingredients in a national brandname veggie burger:
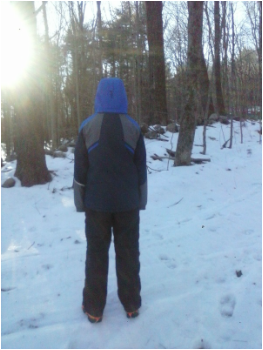
TEXTURED VEGETABLE PROTEIN (SOY PROTEIN CONCENTRATE, WHEAT GLUTEN, WATER FOR HYDRATION), CORN OIL, EGG WHITES, CALCIUM CASEINATE, CONTAINS TWO PERCENT OR LESS OF MODIFIED TAPIOCA STARCH, ONION POWDER, MIXED TRIGLYCERIDES, CANOLA OIL, HYDROLYZED VEGETABLE PROTEIN (CORN GLUTEN, WHEAT GLUTEN, SOY PROTEIN), DEXTROSE, SOY PROTEIN ISOLATE, NATURAL AND ARTIFICIAL FLAVORS, SALT, YEAST EXTRACT, SUGAR, CARAMEL COLOR, WHEY*, METHYLCELLULOSE, SPICE, GARLIC POWDER, MALTODEXTRIN, DISODIUM INOSINATE, DISODIUM GUANYLATE, SOY SAUCE (WATER, SOYBEANS, SALT, ETHYL ALCOHOL, WHEAT), AUTOLYZED YEAST EXTRACT, ASCORBIC ACID, THIAMIN HYDROCHLORIDE (VITAMIN B1), NIACINAMIDE, SESAME SEED OIL, SOY LECITHIN, IRON (FERROUS SULFATE), THIAMIN MONONITRATE (VITAMIN B1), PYRIDOXINE HYDROCHLORIDE (VITAMIN B6), RIBOFLAVIN (VITAMIN B2), VITAMIN B12. Never mind that I don't eat soy, gluten, most grains, or dairy anymore. Even barring that, there are so many ingredients that are unsavory. And they are processed, frozen, shipped, stored over such a long period that I'm quite sure that most of the nutrients have died a long, slow death by the time anyone actually gets to eat one. I've tried various homemade bean burgers over the years. They come out heavy and starchy and taste, well, like beans. They also bring with them all of the indigestibility of legumes, which I try to avoid for the most part. I've grilled portabella mushroom caps, which is nice, but not as satisfying as a burger you can sink your teeth into. Last spring, I made a batch of a veggie burger "dough" which included mushrooms, onions, garlic, carrots, peppers and ran it through my Vitamix. The result looked like (literally) a pile of horse crap in the skillet on my stove. Besides looking unappetizing, it didn't hold together and cooked unevenly when I tried to fry it as a patty. Most of it ended up in the trash. Pulling from different ideas I've seen online, and my own preferences for taste, and also needing this to be grain-free, I developed the following recipe. It was perfect - held together for cooking, had a firm, satisfying texture, and even looked kind of pretty - in a veggie burger sort of way. (For folks with nut allergies, I think this could be tasty without the nuts but would add in something else for some crunch in their place such as grated carrots, celery or peppers, diced finely, quinoa or oats if you eat grains. For vegans, you only need to replace one egg to make this a vegan recipe. Use your favorite egg replacer, or try no egg at all. I think they would probably still hold together because of the sweet potato.) Ingredients: 2 Tbsp olive oil 1/2 cup onion, chopped very finely 2 cups mushroom, chopped very finely (I used portabella caps) 2 cloves garlic, minced 1/2 cup sweet potato, diced 1 tsp tamari or Worcestershire sauce 1/3 cup nuts, chopped finely or food processed (I used a blend of almonds and cashews) 1/2 tsp salt 1 egg 2 Tbsp tapioca starch (regular flour or other starches could be substituted if you aren't gluten-free) 1. Heat olive oil in a large skillet. Add onion, mushroom, garlic, sweet potato, and saute over medium heat for about 10 minutes. 2. While it sautes, prepare nuts. I chopped them by hand, only because I couldn't find the right attachment for my blender. Add nuts and combine everything. Allow to cook for 5 more minutes. 3. Put mixture into a mixing bowl. Using a hand "masher", mash up the mixture as much as possible. The sweet potatoes will break down entirely, the mushrooms slightly. 4. Add salt, tapioca starch, and egg. Combine well. 5. Add a little more oil for frying to the skillet. Form the dough into two patties using slightly wet hands, and fry over medium heat, for 3-5 minutes on each side. The patties will brown up nicely. I served ours on eggplant slices that I had cooked at 400 degrees for 10 minutes on each side, along with sweet potato oven fries. We topped it with our favorite burger toppings - ketchup, mustard, pickles, etc. It was delicious. Next time I will double the recipe and freeze a few. 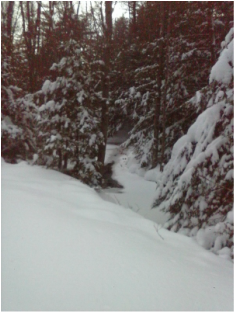 A small stream that runs through the woods along the rail trail where I often walk/ski/snowshoe. A small stream that runs through the woods along the rail trail where I often walk/ski/snowshoe. Well, here in New Hampshire the snow is sure piling up. It's halfway up our front door right now, and I hear there's more on the way. It's cold. Darn cold. So cold that I want to layer up in fleece and long johns and sweaters and wool socks and hide out under my big, fuzzy blanket. All. Day. Long. I also feel like eating baked goods - lots of them - which is the last thing that my body needs. (The banana bread in a previous post was easily devoured within 24 hours, and I'd love to blame it on the men in my home, but I did my fair share of damage.) There is certainly a place for hunkering down with warm stuff and baked goods, here and there, but every day? Not a great plan. So I've been coming up with ways to stay active, get fresh air, and keep building strength despite the cabin fever. Things I can do that are close to home, and not an all-day excursion, but sustainable, daily activities that can be done in an hour or two. I find that I need the following: -A good, moisture-wicking base layer. If you don't have one already, it's worth the investment. I have two sets, but they wash and dry really quickly for daily use. -Warm, squishy hiking socks (mine are a merino wool blend) -Snow pants -A warm fleece and a waterproof shell -Warm hat and neck gaiter, and good gloves and liners -Sometimes goggles, though I don't like them because they leave unflattering lines on my face and, I swear, accentuate my under-eye bags for at least 24 hours. Yes, I'm that vain. Sunglasses often do the trick. To motivate myself to get out in the cold on a weekend day or day off, I will actually put my base layer on in the morning instead of clothes as a way of declaring my intention to be active outdoors. I also do a lot of bribing myself with the thought of the hot shower I'm going to take when I get home, and that amazing post-exercise endorphin high. Good workout, warm shower, endorphin release = my personal trifecta. Oh - and a pot of ginger tea. Any of the following activities are fantastic. I usually end up pulling off drenched base layers afterwards, even though I didn't sense myself sweating during the exercise. Moving through the snow adds a challenging and fun twist to any workout. We live near rail trails which are perfect for walking/skiing/snowshoeing, but last winter, in the absence of rail trails close to home, I went to the golf course in town and made my own tracks there. It was beautiful at sunset. When the boys were little, I actually made a x-c ski track around my back yard and would ski "laps" while they built forts and played in the middle of the yard. Conservation trails work well, or any open field or area that is traffic-free. Breaking your own trail is more tiring in the absence of grooming or snowmobiles, but adds to the quality of the workout. Snow Walking - bare boots - I love snowshoeing and winter hiking. On days that don't allow for a longer excursion, even just a 30-minute walk in the snow will get your heart beating fast and get you a great workout. You don't need any gear outside of some waterproof boots. It's hard to walk in snow - kind of like walking in sand - and is pleasantly exhausting. Snow shoes open up the terrain you can cover, of course, and crampons are important for certain conditions when climbing hills/mountains. But neither is required for a winter walk. Go across a field, or your yard, or venture into the woods. Snowshoeing - So easy - just strap them on and walk out the door. I find that I am more tired and sweaty after a snowshoe than a cross country ski. Thirty minutes is enough to get a very effective workout. The route I've been walking takes me down the rail trail then out onto a property, around a pond, over a stream past a dam, then through a field. It takes about one-and-a-half hours. Late afternoon at sunset is beautiful, but so is early morning. Or try a full moon hike at night. We went out for a 2-hour snowshoe under the full moon a few weeks ago and it was incredible. You can rent snow shoes to try them out - I know that many of the EMS locations in New Hampshire will rent them for the day. If you buy, spend a little extra to get shoes with good, easy-to-use bindings. They make a huge difference. Cross Country Skiing - I bought a whole set (skis, boots, bindings, poles) for $100 at the end of the season back in 2003. I still use the same set. I just broke my pole today, actually, when I took a bit of a spill trying to get up a steep hill. But I've used them nonstop without a single problem otherwise. Probably the best hundred bucks I've ever spent. I have skiied everywhere from groomed trail networks to conservation land to my backyard. Once you have a set, you can make them work almost anywhere - you just need a few inches of snow to get a nice glide going. If you don't know how, go to a ski area and rent a set (usually around $15 for the day) and take a friend who can show you how. I have one of my long-time close friends to thank for my own ability to ski. Shoveling - Not nearly as enjoyable, but still counts as a good workout. Switch arms to get equivalent muscle burn - and to save some strain on your dominant arm. Enough said. Hanging Crunches and Pull Ups - Soon after we moved into our new house, I bought one of those pull up bars that can be put up in a doorway. It's become a family tradition to do a few pulls ups at random times throughout the day. I have also been doing hanging crunches and oblique twists in between other activities - throw in a load of laundry, do 20 hanging crunches. This is keeping my upper body and core strength up, even though I am less active than I would be in warmer weather. Yoga/Deep Stretching - All of the movements in the snow really work the hips, quads, and knees. Stretching out after is so important to avoid injury. I have pretty much eradicated my left knee and hip pain by doing long, deep stretches of my hips, legs, and lower back. My favorite way to do this is through a variety of yoga poses. Sometimes I make it to a class, but more often I just flow through poses that I am familiar with. I have always considered stretching secondary to getting the more intense aspect of my workouts, but, particularly as I get older, I am recognizing that it's actually the stretching that is important, and the rest of it is just the icing on the cake. 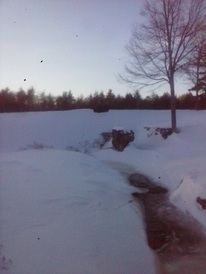 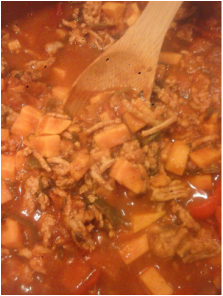 We eat a lot of chili at our house - it's quick and easy, and makes great lunch leftovers for the kids. Or a topping for nachos on a night when we need a fast dinner. Or a topping for baked potatoes. You know the drill. Typically I just make classic chili, but I don't really enjoy it anymore. I prefer veggie-heavy chilis, while the kids like beans and meat. So tonight I'm making two chilis - one for them, and one for me.
This chili has lots of vegetables and is made with ground turkey rather than ground beef - not because I'm afraid of eating fat, but because I prefer ground turkey and chicken, just because. It is grain- and legume-free. And loaded with flavor. And super easy to throw together. This would be great as a vegetarian entree, as well. I would probably add some extra veggies to compensate for the meat - mushrooms? Zucchini? Eggplant? All of the above? Ingredients 1 onion, chopped 2 garlic cloves, minced 2 Tbsp olive oil 2 Tbsp chili powder 1 Tbsp cumin 1 tsp salt 1 pound ground turkey 1 green pepper, chopped 1 red pepper, chopped 1/4 cup fresh cilantro, chopped 1 cup chopped fresh tomatoes 2 sweet potatoes, peeled and diced 1/4 cup tomato paste water or broth 1. Heat oil in a skilled or large pot over medium heat. Add onion and garlic. Cook for 5 minutes, until soft. 2. Add chili powder, cumin, and salt. Stir to combine. Add meat and stir well again. Let cook for 2-3 minutes. Turn heat to medium-low. 3. Add 1/2 cup water to deglaze the pan. Add chopped veggies and stir well. Let simmer for a few minutes. 4. Add tomato paste and about 2 cups of water/broth. Stir to combine. Let simmer for at least 10 more minutes, or much longer, until ready to serve. As an alternative, toss everything in a crock pot in the morning and cook on low for 8 hours. 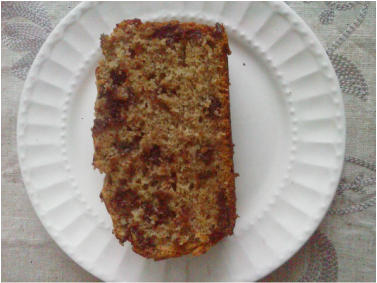 Blizzard = two days snowed in at home = banana bread. Naturally.
This is adapted from the recipe found in The Moosewood Cookbook by Mollie Katzen, one of my favorite vegetarian cookbooks. I made it milk-free and allergen-free. I also cut the recipe in half and added chocolate chips. This is dairy-free. If you are opposed to using grains at all, try it with coconut or almond flour. This is very yummy warm with coffee. Especially while watching a movie on a Wednesday morning, wrapped in a cozy blanket on the couch, watching the snow come down outside the window. Ingredients 3/4 cup melted butter 3/4 cup sugar (use whatever type you like) 2 eggs 1 tsp vanilla 2 cups GF flour, plus 1/2 tsp xantham gum if your blend doesn't include it (or wheat flour if you aren't GF) 1/2 tsp salt 1/4 tsp baking soda 1 1/2 tsp baking powder 1 tsp cinnamon 1 cup mashed banana soaked in 1/2 cup black coffee (do not even think about skipping this bit) 1. Combine melted butter, sugar, eggs, and vanilla in a mixing bowl. Mix until light and fluffy. 2. Meanwhile, mash bananas in a separate dish and mix in black coffee. I used cold coffee that was leftover from the morning. Let it soak while you finish combining dry ingredients. 3. Combine all dry ingredients in a separate bowl. (Original recipe calls for sifting, though I skipped the sifting myself. This is a bad habit I have - skipping the sifting - which I blame my mom for. Thanks, mom. The bread still came out light and fluffy, so I think the woman may have a point.) 4. Combine dry and wet ingredients. Mix well. Add bananas and coffee, and combine. I folded in 1 cup of chocolate chips at this point. Pour into a well-greased loaf pan. Bake at 350 degrees for 40 minutes. Check to make sure it's done in the middle. My loaf this morning required another 15 minutes. This was one of the better GF quick bread recipes I've tried. Enjoy! 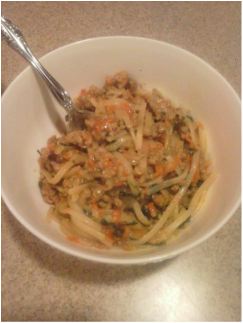 This came out surprisingly delicious, and was a hit with the kids, too. It takes about 30 minutes from start to finish, making it a great work night dinner. I had fish sauce on hand so I used it, but if you don't have any, or don't care for the...aroma...using soy sauce alone would work fine. This dish has a great combination of sweet/savory/spicy tastes.
Ingredients: 2 Tbsp oil 1 onion, chopped 3 cloves garlic, minced 2 Tbsp fresh ginger, grated About 1 pound ground turkey or chicken 3 scallions, chopped 1 cup grated carrots 1 1/2 Tbsp soy sauce (gluten-free), or Tamari sauce 1 Tbsp fish sauce (if you have it, Otherwise, add an extra 1/2 Tbsp soy sauce.) 2 Tbsp lime juice (or half of a freshly squeezed lime) 2 Tbsp brown sugar Crushed pepper to taste, if you like spice. Otherwise, omit it. 1/2 box of rice noodles (I used fettucine style) OR riced cauliflower or zucchini noodles for lower carb, grain-free options. 1) In a large skillet, gently saute onion, ginger, and garlic in the oil over medium heat. After about 5 minutes, add meat and cook until broken up and heated through. 2) Add scallions and carrots and cook for another 5 minutes. 3) Add soy sauce, fish sauce, lime juice, and sugar. Stir well to combine. Turn heat down and allow to simmer for another 10 minutes. 4) While cooking the above, start a large saucepan of water heating over high heat. Once it comes to a boil, add rice noodles, cover, and turn the heat off. They should be soft in about 10 minutes. 5) Strain noodles. Mix into meat mixture in the skillet. Heat for another 2 minutes, and then it's ready to serve.
It's a gorgeous, sunny afternoon. Our midterm schedule at school this week means I get home at 1:30 rather than the usual 4:30 or 5, which means that I have the luxury and privilege of a few hours to spend in winter afternoon sunlight, even though it's a weekday. Which means that I will most definitely spend them outside.
My initial thought is to go alone - I love the solitude that a long walk affords - but I take a look at my boys, all arms and legs and deep voices these days, and I figure they need the afternoon sunlight as much as I do. If not more. Teenage boys gulp down resources - food, water, love, laughter - with a voracity that continues to surprise me. I like to feed those appetites as much as I can, while I can. I goad them into joining me. In our new home (which I love in a disturbing, obsessive way), we live about a 12-minute drive from trail heads at two local state parks, Pawtuckaway and Bear Brook. Both offer acres upon acres of wooded wilderness, swimming holes, streams, and soft, forest-y silence. This weekend, a long weekend, I finally took the time to print out PDFs of trail maps of both locations. When I look at a trail map, any trail map, I get that kind of excited-kid feeling, seeing all that there is to explore. I love that someone has taken the time to build trails, maintain trails, and map it out. Seeing it laid out on paper makes me want to go. Now. I plan a loop through Bear Brook, which will take us up Hall Mountain, a hill, really, at 980 feet. But still. Time in the woods is time in the woods. We pack lightly for this short walk - water, layers, gloves and crampons. Rather than grabbing my fully-equipped pack, I get lazy and grab the closest one, a decision I'll kick myself for later. Everyone got a new set of crampons for Christmas this year, and the boys haven't tried them out yet. The boys also both have new hiking boots to break in, and I figure better on a short afternoon walk than on our first spring hike in the Whites. I anticipate we'll be gone for two hours at the very most, including the drive. The boys got used to hiking 10- and 15-mile trails with tons of elevation gain this summer. An amble in Bear Brook will be a breeze. And I tell them so. The map I'm using is for mountain bikers. It has contour lines and details the network of biking trails that run through the park. Snowmobilers also frequent the park in the winter, so I'm confident that there will be clear, broken trails. And there are. We park on Podunk Road (yes, it's really named that) and head up the Hall Mountain trail. The crampons come in very handy. The snow is packed and slightly soft, but there are extended icy patches as well. The route up to the summit is a breeze, and we are there in well under 30 minutes. It's about 3:00 when we summit Hall Mountain. There are two choices from here - head back the way we came - a guarantee - or continue on the loop. My oldest and I look at the map together and decide to continue on the loop that I had originally considered, even though the trails aren't marked with the blazes that I've grown accustomed to. I have directional issues (to say the least), and I am trying to learn to read maps accurately, but also appreciate having another source showing me that I'm on the right path. We evaluate where the sun is, and where the trail heads, and decide to continue on the loop. It's gorgeous as we walk through the woods. We see bear, moose, and deer tracks. We separate a bit on the path, each of us getting into our own walking rhythm and our own thinking space. We check in with each other once in a while, but it's a wonderful time of communal solitude. The woods are silent, the occasional tree creaking, the crunch of snow and ice under crampons are the only sounds. As the sun sinks lower in the sky to the west, a golden light filters through the trees, lighting up the barren landscape in a way that I find both evocative and enticing. At the next trail junction, we stop and re-evaluate: map, sun, energy level, estimated sunlight left. Again, the question of do we head back the way we came (the certain path) or continue on the loop (which looks convincingly reasonable). There are no blazes, still, but a well-broken trail. We continue on the loop. I'm getting a bit nervous now. Mileage-wise, on the map, we are under 2 miles from the car. It's only 3:30. We move at a pretty good pace when we hike, and, without significant altitude changes to deal with, I am confident that we can be there in well under an hour. But still. I'm a mom, and I'm out here with my kids. They may outsize me in every way at this point (the youngest recently surpassed me in both height and weight), but I still feel that maternal responsibility. At the next junction, the trail splits. There is a smaller trail that cuts a big corner and gets us back to the parking area faster, or a main trail that will take longer. We see the smaller trail off to the right with a sign at the start of it. It seems straight forward. It aligns with what is on the map, and where the (continually sinking) sun is. We head down the smaller trail. We've gone about 15 minutes when the voices of doubt start to enter. It feels to me like we are headed southwest when we should be headed southeast. Since I didn't bring my own fully-equipped pack, I don't have a compass. Or head lamp. Or fire starter. All of this weighs on me. "Stupid, stupid, stupid," I think, plus some more colorful words. The trail, which is broken, is not marked with blazes, so it's impossible to know at this point if we are on the actual trail or just following someone else's steps. But if it is the right trail, we are almost to the road. Almost. Just another 5 minutes, I think. We must be close. I don't want to alarm the boys. I don't want to retrace our steps. My heart starts to beat faster. We come upon a body of water to the left and stop to re-evaluate. I'm watching the sun sink further down. We are in deep forest now, and I'm picturing us becoming a news story. When we look at the map, I see that we are on the wrong side of the body of water. And there are two potential bodies of water it could be. And I'm not sure which it is at this point - I'm so turned around. The trail could be just over there, or we could be in the middle of the park. My oldest weighs in on his opinion, and make a call together. We need to go back. Quickly. I know if we can get to the main junction and trail that we can follow a larger trail back to the car. Even if it's dark, that's better than being stuck on this little trail in the woods. At this point, we've already walked over 4 miles in snow with crampons, which is tiring. In terms of fitness levels, I'm definitely most fit, and my older son is fairly fit, but my youngest hasn't hiked farther than 2 miles since the fall. This is a physical challenge for him. We need to move fast, but I don't want to be too alarmist. I move very quickly back on the small trail. I'm afraid that if, worst case scenario, it gets dark while we're on this trail, we'll lose our footprints. The only light I have is on my cell phone, as I didn't bring the aforementioned properly stocked pack. I figure if I'm at the junction, I can guide them back to the main trail using my voice and light from the cellphone. I'm relieved to get back to the junction. Even though the first leg of the main trail isn't labeled, it appears on the map that it has to be Bear Hill, the trail we're looking for. It's about a mile on this trail back to the Podunk Road trail that will get us back to our car. We still have over 2 miles to cover in increasing darkness, but I feel better being a major trail and knowing that we are headed in the right direction. I take a deep breath and relax. We still need to move quickly, stay warm, and be safe. But we're on the right trail. As the sun sets further into the sky behind the trees, the sky starts to glow a beautiful, ephemeral periwinkle color. A crescent moon comes up. We can see a few planets. In the distance, evergreens form a black silhouette against the glowing pastel sky. I stay relaxed, and so the boys stay relaxed. We talk. I review chemistry with my younger son, who has a test tomorrow. We make our way through some dark woods, but we have enough residual daylight to see our trail. Nearly 45 minutes later as we finally approach the car, I say to my boys "Now don't you wish you had a mom who just came home from work and watched TV?" I chuckle; they don't. My oldest says, genuinely, that this is the most enjoyable thing he's done in a long time. My youngest just wants to know if he can play Destiny (a Playstation game) when he gets home. Classic. I committed all of the classic blunders of unprepared hiking, and I feel foolish for that. But we were okay, I had contingency plans, and it ended up to be a good object lesson on several counts: Be prepared for the worst. Always. Don't let someone else's steps override your instincts. Sometimes, in some circumstances, the well-traveled road is the better choice. And most of all, my boys rock. What a privilege it is to be raising them. I hope I'm doing right by them. 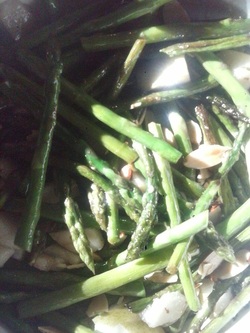 1 - Roasted chicken with pan-seared asparagus salad - I will use the chicken carcass and leftovers to make soup for another night this week. 2 - Chicken soup with Greek salad and Brazilian cheese puffs - this cheese bread is gluten free, but nowhere near dairy free. But amazing. Eat it warm! 3 - Fresh herb frittata with oven-baked potato pancakes - both inspired by my younger son. 4 - Pizza and Turkish red lentil soup - for GF pizza, my favorite crust recipe that I've found so far is here. No rising time! Or try veggie crust for a lower carb, grain-free option. 5 - Thai basil chicken - a simple, one bowl meal for a busy evening 6 - Mexican-style shredded chicken taco salad with refried beans - cook chicken and serve over a bowl of rice or a big green salad. Include avocado and fresh cilantro, if you can find them at this time of the year. Dress with a 1:1 mixture of lime juice and olive oil, sprinkled with a little salt and cumin. 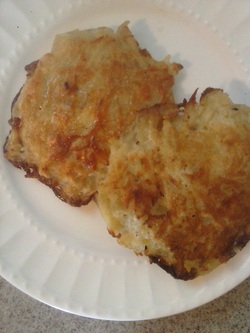 These are a delicious alternative to hash browns on a weekend morning or a nice side dish with a light supper. They can be pan-fried, but I recently tried baking them and found it to be a lot less messy (less splattering oil) and convenient in that I put them in the oven and forgot about them for 20 minutes. If you aren't gluten-free, regular flour can be substituted for the brown rice flour. Try this with sweet potato, too.
Ingredients: 3 cups of shredded potatoes 1/2 cup grated onion (optional, but delicious) 1/2 tsp salt 1 egg 1/3 cup brown rice flour 1. Put shredded potatoes into a mixing bowl, Using a paper towel or cheese cloth, blot dry to remove excess moisture. 2. Add remaining ingredients. Mix well. Place by large spoonfuls (about 1/3 cup) onto a cookie sheet. Flatten to about 3/4 inch. Bake at 400 degrees for 20 minutes. After 20 minutes, flip them over. Add more oil to the cookie sheet if needed. They will be golden-brown when done. 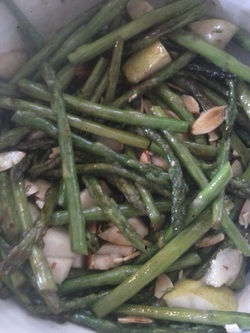 Ingredients
1 bunch of fresh asparagus, trimmed and cut into 4" stalks Olive oil 1 fresh pear, diced 1/4 cup slivered almonds Salt and pepper Balsamic vinegar 1. Cook asparagus in a well-oiled skillet over medium-high heat for about 5 minutes, stirring occasionally. Remove from heat and allow to cool. 2. When cool, add pear, almonds, salt and pepper to taste, 3 Tbsp balsamic vinegar, and 1 Tbsp olive oil. Toss and serve, cold or at room temperature. |
AuthorI'm Emily. I currently work in online education management, but I also have a Masters degree in Nutritional Sciences (my true passion). In addition, I am a mom, cook, avid reader, novice gardener, and enjoy all kinds of outdoor activities. On my blog, you will find articles on food, fitness, weight management, and eating issues. ALL recipes on my blog are gluten-free. Many are low-carbohydrate. Most are grain free. Enjoy! 
Categories
All
Archives
June 2019
|